CUDA for Machine Learning — Intuitively and Exhaustively Explained
Parallelized AI from scratch

In this article we’ll use CUDA to train an AI model on a GPU, essentially implementing AI from scratch, assuming virtually no prior knowledge.
First, we’ll explore some core components of modern computers, then we’ll dive into the GPU to describe what it is, how it works, and why it’s useful for AI. We’ll then work through an introduction to CUDA. We’ll describe what CUDA is and explain how it allows us to program applications which leverage both the CPU and GPU. Once we have an idea of how CUDA programming works, we’ll use CUDA to build, train, and test a neural network on a classification task.
Who is this useful for? Anyone who wants to forge a deep and thorough understanding of AI.
How advanced is this post? Given the advanced subject matter, this article may be more approachable to those with some machine learning experience. If you don’t have machine learning experience you’ll certainly learn a lot by reading this article, though. Just take it section by section and Google a lot.
Pre-requisites: Basic software development skills. Some exposure to C++ may be helpful but is not required. It also might be useful to be familiar with the general concept of a derivative.
Attribution: This article was largely inspired by two tutorials. This wonderful YouTube series on CUDA, and this tutorial on implementing a neural network in CUDA.
Why CUDA is Worth Learning
Before we dig into this massive article, I’d like to address a question that might be on many data scientists' minds. “Why would I bother with CUDA when I can just use PyTorch?”
PyTorch is a machine learning library which allows advanced AI models to be created, trained, and run on the GPU. To a large extent, many of the rapid AI advancements over the last few years have been thanks to the ease of use and power of PyTorch.
But, at the cutting edge of AI advancements, PyTorch is not always enough. Flash Attention, for instance, improved on the speed of attention by a factor of 10x by re-designing PyTorch’s implementation of attention in CUDA. This article isn’t about Flash Attention (I plan on covering that soon) but touches on a greater trend; As AI matures as a discipline, efficiency is becoming more important.
The research is clear — bigger models are better. The more efficiently AI models can be trained and served, the bigger they can be, and the more useful they can become. While PyTorch is critical in pushing the state of the art, low level CUDA remains an important tool for implementing cutting edge AI efficiently.
Also, PyTorch uses CUDA to interface with the GPU, so even if you’re using PyTorch you’re probably also using CUDA under the hood anyway. You can create custom PyTorch functionality in CUDA, so CUDA can be a useful skill to learn if you already use PyTorch.
The Composition of a Modern Computer
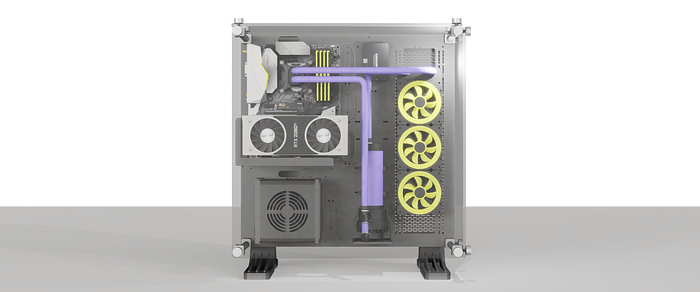
There are deviations from this general model (I.e. Groq) but 99% of computers are composed of the following elements:
For the purposes of this article (implementing AI on the GPU with CUDA) we’re chiefly interested in understanding the Motherboard, the CPU, RAM, and the GPU.
The Motherboard is the backbone of a computer. It’s essentially a big circuit board which allows components of the computer to communicate with one another.
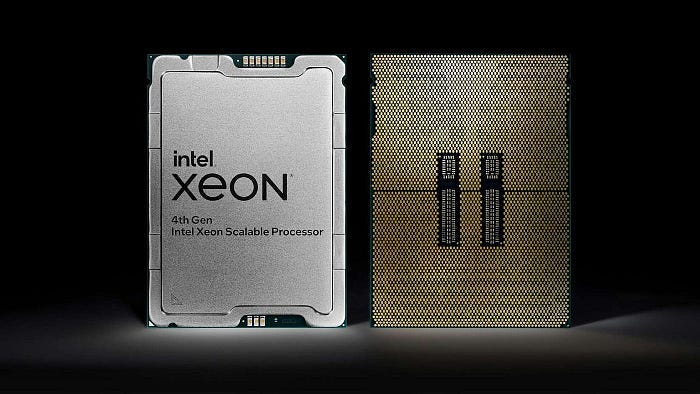
In the middle of the motherboard lies the beating heart of virtually every modern computer: the CPU, or “Central Processing Unit”. The CPU is responsible for executing calculations necessary to run a program, and is thus one of the most important components of a computer.
Because the CPU produces heat, the CPU is typically covered with a heat sink, which is why we can’t see it in this rendering. Typically a CPU looks like a metal square with a bunch of pins on the bottom.
Very close to the CPU is RAM, which stands for “Random Access Memory”. RAM is the working memory of the CPU, and is designed to allow for the rapid access of relevant information.
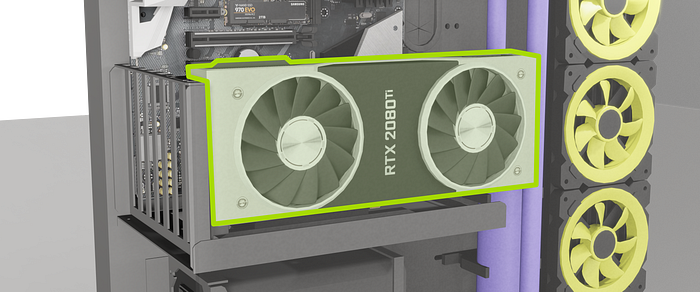
Another popular component of many computers, and the subject of this article, is the GPU, or “Graphics Processing Unit”. We’ll get into exactly what the GPU does in the following sections, but for now it’s sufficient to know that the GPU is designed to help the CPU on certain types of calculations.
Gamers love their GPUs, so this one is front and center; using a ribbon cable to connect the card with the motherboard.
Like much of the consumer hardware space, this is purely aesthetic. In an enterprise setting the GPU would be as close to other components as possible, so it would probably be mounted directly to the PCI-E port.
PCI-E, or “Peripheral Component Interconnect Express” is a set of ports on many motherboards which allows the CPU to communicate with external devices. The most common use for PCI-E is the connection of GPUs, but PCI-E is a flexible interface; allowing storage devices, specialized cards, and other devices to be connected to the computer.
In many ways, components on the PCI-E bus are “addons” to the core of the computer. The CPU and RAM are vital in the operation of the computer, while devices like the GPU are like tools which the CPU can activate to do certain things. This conceptualization remains relevant even at the lowest levels of programming. Thus, often the CPU and RAM are referred to as the “host”, while the GPU is referred to as a “device”.
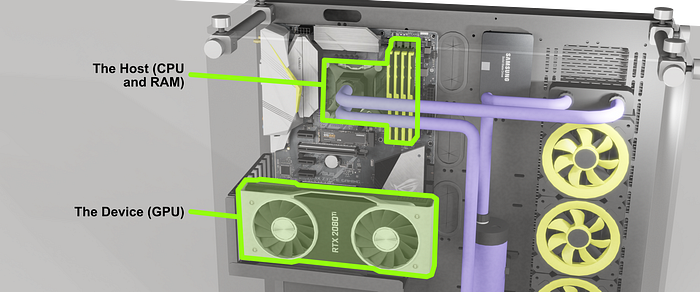
Structurally, if we remove the outer casing of the GPU and examine its inner workings, we find that the GPU is somewhat similar to the host (the CPU and RAM).
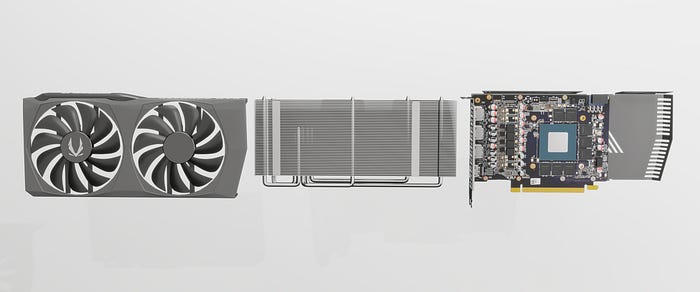
At this point it makes sense to get our definitions cleared up. While the entire graphics card is often referred to as the GPU, in reality the term GPU refers to a processing unit within the graphics card.
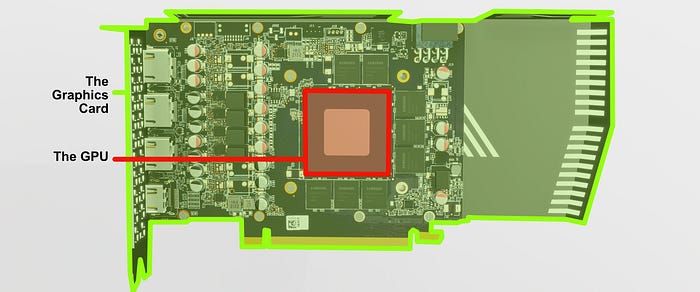
There are other major components of the graphics card besides the GPU, like vRAM, which is essentially the graphics card equivalent of the CPU’s RAM.
And thus we come to the major conclusion of this section: The device (the graphics card) has a processing unit and memory. The host (the CPU and RAM) has a processing unit and memory. Both the device and host have the necessary resources to work independently from one another. Building low level applications which use both the device and host requires programming two entities which work collaboratively.
A natural question might arise: “If the device and host are so similar, just a compute module and some memory, why do we need both of them”?
Why GPUs Matter in AI
To understand why the GPU exists it’s helpful to first understand the CPU a bit more thoroughly. I’m going to blitz through this section, but I cover these concepts much more thoroughly in another article if you’re interested in digging a bit deeper:
The CPU is made up of “cores”. A core is a circuit designed to do basic mathematical operations very quickly. While simple, the math a core can do is fundamental, and combining many of these simple calculations can result in virtually any mathematical operation imaginable.
A modern CPU has several of these cores such that the CPU can work on multiple things simultaneously. The CPU also has different types of memory (called cache) which is designed to speed up the CPU.
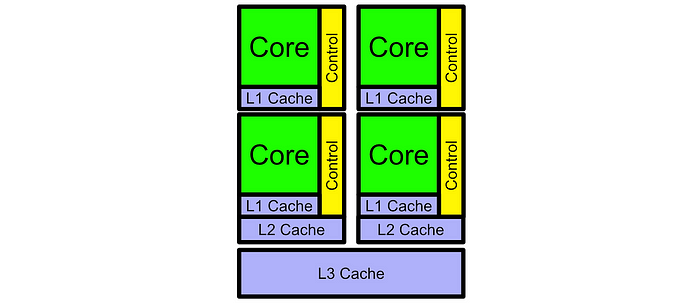
The whole idea of the CPU is to run a program, which can be conceptualized as a list of operations, as quickly as possible. While a CPU can do things in parallel (called multithreading) the main focus of the CPU is to be as fast as possible in back to back calculations. Thus, each core of a CPU is designed to do each operation as quickly as possible.

This approach is vital for many applications. Some calculations simply need to be done one after another, and the only way to do those calculations faster is to make each step as fast as possible. However, some applications can be parallelized.

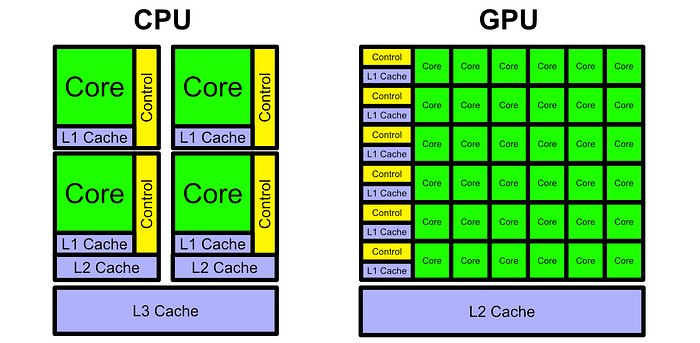
The idea of the GPU is not to optimize single calculations, but to optimize running many calculations in bulk. Generally the GPU is much slower than the CPU at a given calculation, and thus only really shines when there are sufficient calculations which can be run in parallel. When applied to the right problem, though, a GPU can be 100x or even 1000x faster than a CPU.

There are two core deviations the GPU takes from the CPU in focusing on parallel computation:
The GPU has a greater quantity of cores than the CPU, but those cores are less capable. This means the GPU can do more calculations at once, but those calculations are typically slower.
The GPU is set up to allow for SIMD, “Single Instruction Multiple Data”. Basically, a single control circuit controls multiple cores within the GPU.
Originally the GPU was created for rendering graphics for video games, but has since exploded in popularity, consequently exploding NVIDIA’s valuation.

The reason for this explosive success is largely because of a serendipitous coincidence. As it turns out, there are a lot of other useful things you can do with a GPU besides graphics. AI models, for instance, are a perfect use case for GPUs as AI is basically done with a bunch of simple, and more-or-less independent, calculations.
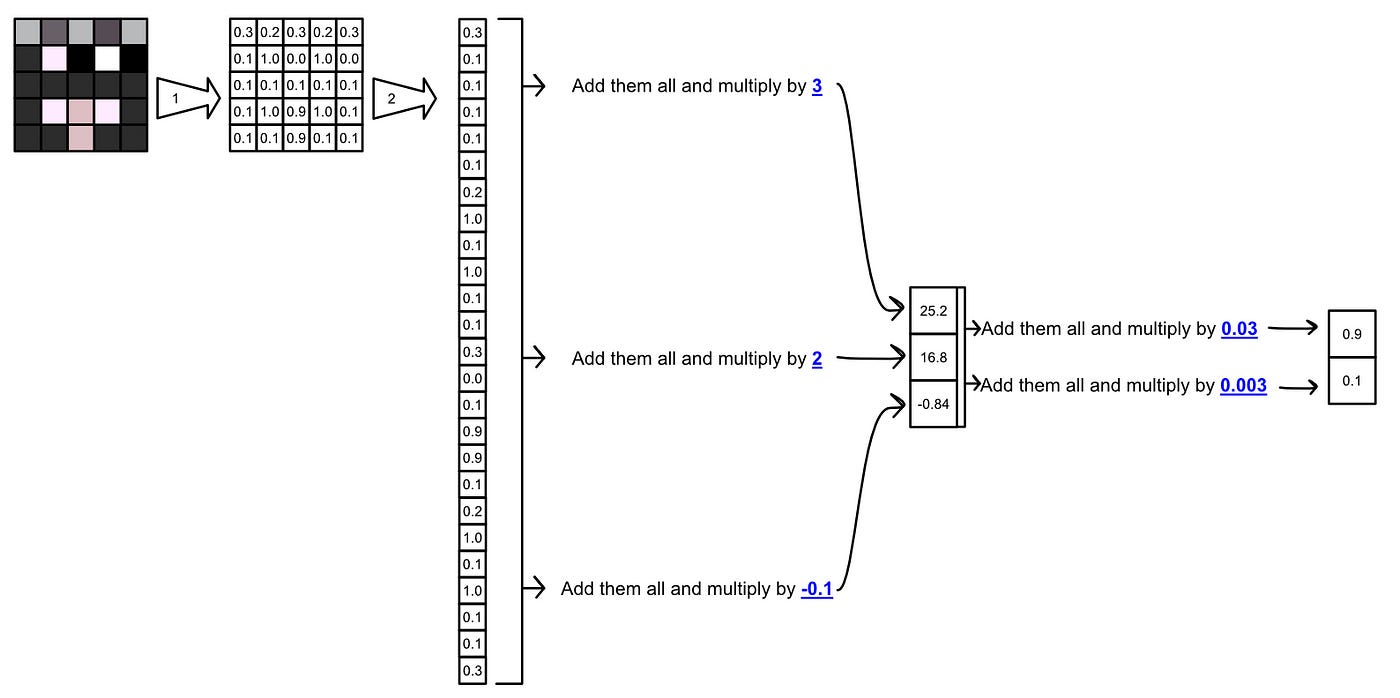
Ok, so we understand the core components of the computer, and we understand why the GPU is useful in AI. Let’s start getting an idea of how to get the GPU to do things.
An Introduction to CUDA
Full code can be found here
CUDA, or “Compute Unified Device Architecture”, is NVIDIA’s parallel computing platform. CUDA is essentially a set of tools for building applications which run on the CPU, and can interface with the GPU to do parallel math.
Probably the most popular language to run CUDA is C++, so that’s what we’ll be using. Don’t worry though, I’m a data scientist that chiefly uses Python, so the C++ in this article should be fairly approachable (and hopefully not a source of judgement from more senior C++ devs).
I’ll be using Google Colab as my development environment. There’s a handy Jupyter extension that can compile and run CUDA code just like if it were a normal code block. This allows Jupyter to hook into nvcc, NVIDIA’s CUDA compiler. Luckily for us, GoogleColab already has nvcc set up, so we just need to install and load the extension.
!pip install nvcc4jupyter%load_ext nvcc4jupyterWith nvcc4jupyter we can run a block of CUDA code just like a normal python block by adding %%cuda at the top of the cell:
%%cuda

//we'll cover what all this stuff means soon
#include <stdio.h>

__global__ void hello(){
    printf("Hello from block: %u, thread: %u\n", blockIdx.x, threadIdx.x);
}

__host__ int main(){
    hello<<<2, 2>>>();
    cudaDeviceSynchronize();
}Around halfway through the article we’ll use a slightly different approach to launch CUDA that allows us to work on more complex projects, but for now we can use this simple method to explore how CUDA works.
CUDA Kernels and Launch Configurations
The first fundamental idea of CUDA is the kernel. Basically, a CUDA kernel is a function that runs many times in parallel across the GPU. In CUDA we define a kernel with the __global__ keyword before a function definition. We can also define the code that runs on the CPU with the __host__ keyword.
%%cuda
#include <stdio.h>

//this runs on the GPU because it's __global__
__global__ void hello(){
    printf("Hello from block: %u, thread: %u\n", blockIdx.x, threadIdx.x);
}

//this runs on the CPU because it's __host__
__host__ int main(){
    hello<<<2, 2>>>();
    cudaDeviceSynchronize();
}
because this is C++, the first thing that gets executed is the main function, which happens to be on the CPU (aka the host). then, on the CPU, the first line of code that gets called is hello<<<2, 2>>>(); . This is called a launch configuration, and launches the CUDA kernel hello on the GPU.
In CUDA, a parallel job is organized into “threads”, where a thread is a piece of a program that can work in parallel. You can spool up multiple threads on the GPU, and they can all work together to do some task.
These threads exist in something called a “thread block”. On modern GPUs there can be 1024 threads per thread block. Threads in the same thread block share the same address space in vRAM (the GPU equivalent of RAM), so they’re able to work with one another collaboratively on the same data.
While you can only have 1024 threads per block, you can have a ton of thread blocks queued up on the GPU.
Most GPUs have the resources to execute more than one thread block at a time. One GPU might only be able to execute two thread blocks at a time, another might be able to execute eight of them. This means the same CUDA code can leverage both large and small GPUs.
We define how many threads and thread blocks we’ll be using with our launch configuration. Within the triple chevrons <<< >>> we specify the number of thread blocks as the first parameter and the number of threads per block as the second.
%%cuda
#include <stdio.h>

__global__ void hello(){
    printf("Hello from block: %u, thread: %u\n", blockIdx.x, threadIdx.x);
}

__host__ int main(){
    //Launching out kernel across three thread blocks,
    //each consisting of two threads
    hello<<<3, 2>>>();
    cudaDeviceSynchronize();
}
Because the kernel is running on the GPU, to get the results from printing back onto the CPU so it can be displayed in jupyter, I’m using cudaDeviceSynchronize to wait for all threads on the GPU to complete, which allows the printouts to propagate from the device to the host.
When you run a kernel, CUDA automatically creates some handy variables. Two very important ones are blockIdx and threadIdx . You can use these variables to understand which block and which thread is currently being run.
Thread blocks can organize threads in up to three dimensions, and blocks themselves can be organized in up to three dimensions, meaning blockIdx and threadIdx have an x , y , and z attribute
%%cuda
#include <stdio.h>

__global__ void hello() {
    printf("Hello from block: (%u, %u, %u), thread: (%u, %u, %u)\n",
           blockIdx.x, blockIdx.y, blockIdx.z,
           threadIdx.x, threadIdx.y, threadIdx.z);
}

int main() {
    // Define the dimensions of the grid and blocks
    dim3 gridDim(2, 2, 2);   // 2x2x2 grid of blocks
    dim3 blockDim(2, 2, 2);  // 2x2x2 grid of threads per block

    // Launch the kernel
    hello<<<gridDim, blockDim>>>();

    // Wait for GPU to finish before accessing on host
    cudaDeviceSynchronize();

    return 0;
}
In other words, CUDA allows you to build a grid of calculations in up to three dimensions, and informs a thread where it is in that grid via the blockIdx and threadIdx. We’ll explore this idea more in a future section.
Communication Between the Host and Device
To send data to the GPU we can first use cudaMalloc to reserve some spot on vRAM, we can use cudaMemcpy to copy data between RAM and vRAM, and when we’re done on the GPU we can use cudaFree to let the GPU know we don’t need the data in vRAM anymore. After data has been sent to vRAM, we can run a kernel on that data then copy the result back onto RAM, effectively using the GPU to do math.
Let’s explore this code which sends two values to the GPU, uses the GPU to add those numbers together, then gets the result back into RAM and prints the result.
%%cuda
#include <iostream>
#include <cuda.h>

using namespace std;

// Defining the kernel
__global__ void addIntsCUDA(int *a, int *b) {
    a[0] += b[0];
}

// Running main on host, which triggers the kernel
int main() {
    // Host values
    int a = 1, b = 2;

    //printing expression
    cout << a << " + " << b <<" = ";

    // Device pointers (GPU)
    int *d_a, *d_b;

    // Allocating memory on the device (GPU)
    cudaMalloc(&d_a, sizeof(int));
    cudaMalloc(&d_b, sizeof(int));

    // Copying values from the host (CPU RAM) to the device (GPU)
    cudaMemcpy(d_a, &a, sizeof(int), cudaMemcpyHostToDevice);
    cudaMemcpy(d_b, &b, sizeof(int), cudaMemcpyHostToDevice);

    // Calling the kernel to add the two values at the two pointer locations.
    addIntsCUDA<<<1, 1>>>(d_a, d_b);

    // The addition function overwrites the a pointer with the sum. Thus
    // this copies the result.
    cudaMemcpy(&a, d_a, sizeof(int), cudaMemcpyDeviceToHost);

    //printing result
    cout << a << endl;

    //freeing memory.
    cudaFree(d_a);
    cudaFree(d_b);

    return 0;
}
For those that aren’t comfortable with C++, things like * and & are probably throwing you off. These each have to do with pointers. Basically, you can think of both RAM and vRAM as a big array of values. When the code int a = 1, b = 2; gets triggered on the CPU, two spots in RAM get allocated to store the two values.
Each of these values have some address. When we call &a or &b we’re getting the address of those values, not the values themselves.
If you want to keep track of an address as a variable, you can create something called a pointer with *. A pointer is data in memory that points to some other data in memory. for instance, if we ran the code int *pointer_to_a = &a , we would create a spot in memory which holds the spot in memory which corresponds to a .
This idea of pointing to data in memory is critical in low level computation, and is thus critical in CUDA. Because we’re dealing with two independent systems (the device and the host), we typically create pointers which point between the two memory spaces.
In this example, after we create our integers, we create two pointers
// Device pointers (GPU)
int *d_a, *d_b;
These are pointers on the CPUs RAM which initially don’t have a value, but they’re names with a d_ because these pointers will store the location of data on the GPUs vRAM.
After this point we call cudaMalloc , which is designed to allocate some spot in memory on the GPU’s vRAM.
// Allocating memory on the device (GPU)
cudaMalloc(&d_a, sizeof(int));
cudaMalloc(&d_b, sizeof(int));In order to actually use these locations in memory, however, the host (CPU/RAM) needs to know about them. That’s why we passed &d_a and &d_b into cudaMalloc , we’re telling cudaMalloc where to store the new vRAM allocations on RAM.
Thus, by runningcudaMalloc , we now have spots allocated on vRAM, as well as pointers on RAM which tell us where on vRAM those spots are.
We can copy the values of a and b to vRAM using the following code
// Copying values from the host (CPU RAM) to the device (GPU)
cudaMemcpy(d_a, &a, sizeof(int), cudaMemcpyHostToDevice);
cudaMemcpy(d_b, &b, sizeof(int), cudaMemcpyHostToDevice);
This code tells cudaMemcpy where we want the data stored ( d_a and d_b) and the location of the data we want to copy ( &a and &b ), as well as if we’re copying from the host to the device or vice versa. This results in the values of a and b being copied to the device.
Then, when we launch our kernel, we can pass the kernel d_a and d_b so that the kernel knows which values on vRAM need to be modified.
// Calling the kernel to add the two values at the two pointer locations.
addIntsCUDA<<<1, 1>>>(d_a, d_b);
addsIntsCUDA gets run on the GPU, which takes the pointers and adds the value at b to the value at a
// Defining the kernel
__global__ void addIntsCUDA(int *a, int *b) {
    a[0] += b[0];
}
The value which d_a points to then gets copied back onto RAM, and then it’s value is printed, thus printing the final result.
// The addition function overwrites the a pointer with the sum. Thus
// this copies the result.
cudaMemcpy(&a, d_a, sizeof(int), cudaMemcpyDeviceToHost);

//printing result
cout << a << endl;the GPU doesn’t know the CPU is nearing the end of it’s program, so the values on the GPU will sit there until the application finishes. For this small problem this doesn’t matter, but if you had to add 1 and 2 a billion times, you might not want a billion 1’s and 2’s taking up space on your vRAM. So, we call cudaFree to free up the memory.
//freeing memory.
cudaFree(d_a);
cudaFree(d_b);Obviously this is not the most efficient way to add two numbers together, but I hope it gives you an idea of how data is passed back and forth between RAM and vRAM. Before we dig into building an AI model from scratch, I think it might be useful to go over a slightly more advanced example so we can really feel some level of mastery of CUDA.
Parallelizing a CPU Program on the GPU
In the previous sections we went over how to launch a kernel, and how to transfer data between the host and device. Let’s use those concepts to parallelize a program written for the CPU.
Below is a brute force implementation which attempts, for each 3D point in a set of points, to find the closest other point. The end result should be a list, where the value in the i spot in the list should be the index of the point which the i point is closest to. So, if there are three points, and point 1 is closest to point 3, point 2 is closest to point 3, and point 3 is closest to point 2, the output would look like [3, 3, 2] . Here’s the implementation on the CPU:
%%cuda
#include <iostream>
#include <ctime>
#include <cuda.h>
#include <cuda_runtime.h>
#include <device_launch_parameters.h>

using namespace std;

//brute force approach to finding which point
void findClosestCPU(float3* points, int* indices, int count) {
    // Base case, if there's 1 point don't do anything
    if(count <=1) return;
    // Loop through every point
    for (int curPoint = 0; curPoint < count; curPoint++) {
        // set as close to the largest float possible
        float distToClosest = 3.4028238f ;
        // See how far it is from every other point
        for (int i = 0; i < count; i++) {
            // Don't check distance to itself
            if(i == curPoint) continue;
            float dist_sqr = (points[curPoint].x - points[i].x) *
                (points[curPoint].x - points[i].x) +
                (points[curPoint].y - points[i].y) *
                (points[curPoint].y - points[i].y) +
                (points[curPoint].z - points[i].z) *
                (points[curPoint].z - points[i].z);
            if(dist_sqr < distToClosest) {
                distToClosest = dist_sqr;
                indices[curPoint] = i;
            }
        }
    }
}

int main(){

    //defining parameters
    const int count = 10000;
    int* indexOfClosest = new int[count];
    float3* points = new float3[count];

    //defining random points
    for (int i = 0; i < count; i++){
        points[i].x = (float)(((rand()%10000))-5000);
        points[i].y = (float)(((rand()%10000))-5000);
        points[i].z = (float)(((rand()%10000))-5000);
    }

    long fastest = 1000000000;

    cout << "running brute force nearest neighbor on the CPU..."<<endl;
    for (int i = 0; i <= 10; i++){
        long start = clock();
        findClosestCPU(points, indexOfClosest, count);
        double duration = ( clock() - start ) / (double) CLOCKS_PER_SEC;
        cout << "test " << i << " took " << duration << " seconds" <<endl;
    }

    return 0;
}To parallelize this code on the GPU we need to get the points on vRAM, then launch findClosest on the GPU as a kernel.
This is the parallelized version on the GPU, let’s walk through it:
%%cuda
#include <iostream>
#include <ctime>
#include <cuda.h>
#include <cuda_runtime.h>
#include <device_launch_parameters.h>

using namespace std;

// Brute force implementation, parallelized on the GPU
__global__ void findClosestGPU(float3* points, int* indices, int count) {
    if (count <= 1) return;
    int idx = threadIdx.x + blockIdx.x * blockDim.x;
    if (idx < count) {
        float3 thisPoint = points[idx];
        float smallestSoFar = 3.40282e38f;

        for (int i = 0; i < count; i++) {
            if (i == idx) continue;

            float dist_sqr = (thisPoint.x - points[i].x) *
                             (thisPoint.x - points[i].x) +
                             (thisPoint.y - points[i].y) *
                             (thisPoint.y - points[i].y) +
                             (thisPoint.z - points[i].z) *
                             (thisPoint.z - points[i].z);
            if (dist_sqr < smallestSoFar) {
                smallestSoFar = dist_sqr;
                indices[idx] = i;
            }
        }
    }
}

int main() {
    // Defining parameters
    const int count = 10000;
    int* h_indexOfClosest = new int[count];
    float3* h_points = new float3[count];

    // Defining random points
    for (int i = 0; i < count; i++) {
        h_points[i].x = (float)(((rand() % 10000)) - 5000);
        h_points[i].y = (float)(((rand() % 10000)) - 5000);
        h_points[i].z = (float)(((rand() % 10000)) - 5000);
    }

    // Device pointers
    int* d_indexOfClosest;
    float3* d_points;

    // Allocating memory on the device
    cudaMalloc(&d_indexOfClosest, sizeof(int) * count);
    cudaMalloc(&d_points, sizeof(float3) * count);

    // Copying values from the host to the device
    cudaMemcpy(d_points, h_points, sizeof(float3) * count, cudaMemcpyHostToDevice);

    int threads_per_block = 64;
    cout << "Running brute force nearest neighbor on the GPU..." << endl;
    for (int i = 1; i <= 10; i++) {
        long start = clock();

        findClosestGPU<<<(count / threads_per_block) + 1, threads_per_block>>>(d_points, d_indexOfClosest, count);
        cudaDeviceSynchronize();

        // Copying results from the device to the host
        cudaMemcpy(h_indexOfClosest, d_indexOfClosest, sizeof(int) * count, cudaMemcpyDeviceToHost);

        double duration = (clock() - start) / (double)CLOCKS_PER_SEC;
        cout << "Test " << i << " took " << duration << " seconds" << endl;
    }

    // Freeing device memory
    cudaFree(d_indexOfClosest);
    cudaFree(d_points);

    // Freeing host memory
    delete[] h_indexOfClosest;
    delete[] h_points;

    return 0;
}
It starts off the same as the CPU approach, we create a bunch of random points that we need to sort through.
//defining parameters
const int count = 10000;
int* d_indexOfClosest = new int[count];
float3* d_points = new float3[count];

//defining random points
for (int i = 0; i < count; i++){
    d_points[i].x = (float)(((rand()%10000))-5000);
    d_points[i].y = (float)(((rand()%10000))-5000);
    d_points[i].z = (float)(((rand()%10000))-5000);
}
Then we allocate some space on vRAM for the points, as well as a place to store our results.
// Device pointers
int* d_indexOfClosest;
float3* d_points;

// Allocating memory on the device
cudaMalloc(&d_indexOfClosest, sizeof(int) * count);
cudaMalloc(&d_points, sizeof(float3) * count);
We copy the points from RAM to vRAM
// Copying values from the host to the device
cudaMemcpy(d_points, h_points, sizeof(float3) * count, cudaMemcpyHostToDevice);
Then we run the kernel
findClosestGPU<<<(count / threads_per_block) + 1, threads_per_block>>>(d_points, d_indexOfClosest, count);The kernel itself only needs a few modifications to convert it from the CPU to the GPU.
// Brute force implementation, parallelized on the GPU
__global__ void findClosestGPU(float3* points, int* indices, int count) {
    if (count <= 1) return;
    int idx = threadIdx.x + blockIdx.x * blockDim.x;
    if (idx < count) {
        float3 thisPoint = points[idx];
        float smallestSoFar = 3.40282e38f;

        for (int i = 0; i < count; i++) {
            if (i == idx) continue;

            float dist_sqr = (thisPoint.x - points[i].x) *
                             (thisPoint.x - points[i].x) +
                             (thisPoint.y - points[i].y) *
                             (thisPoint.y - points[i].y) +
                             (thisPoint.z - points[i].z) *
                             (thisPoint.z - points[i].z);
            if (dist_sqr < smallestSoFar) {
                smallestSoFar = dist_sqr;
                indices[idx] = i;
            }
        }
    }
}
First, we can assign each thread an individual point, specified as idx . We can do that by essentially counting which thread is currently being executed out of all of the thread blocks.
int idx = threadIdx.x + blockIdx.x * blockDim.x;We can use this unique id to assign each thread to a specific point. So thread 0 is responsible for finding the closest point to point 0 , thread 50 finds the closest point to point 50 , etc.
It’s typical to have a few too many threads, as there might not be enough points to fill out the last thread block, so we only evaluate valid idx values
int idx = threadIdx.x + blockIdx.x * blockDim.x;
if (idx < count) {
  ...
The rest is pretty much identical, except the pointers now point to spaces in vRAM, rather than RAM.
Once the kernel is done executing, and all the values are updated, we can copy them back to the host, then do whatever we want with them.
// Copying results from the device to the host
cudaMemcpy(h_indexOfClosest, d_indexOfClosest, sizeof(int) * count, cudaMemcpyDeviceToHost);
And just like that, we’ve done some honest to goodness work on the GPU. We’re almost ready to get into building an AI model from scratch, but first, I want to briefly cover a super important topic.
The NVIDIA Profiler
When implementing complex parallelized programs in CUDA, it’s useful to know what types of operations have the largest impact on performance.
Instead of calling %%cuda at the top of our code block, we can %% writefile findClosestGPU.cu to write our CUDA code block as a text file. We can then use nvprof to to profile the computation used to perform our CUDA code.
!nvprof ./findClosestGPU.outAs can be seen, doing stuff with memory took over 99.19% of the time of this application ( cudaMalloc and cudaDeviceSynchronize ). We won’t get into optimization in this tutorial, but generally, when doing CUDA programming, the majority of time is spent optimizing memory and inter-device communication rather than computation (that’s how Flash attention achieved a speedup of cutting edge AI by 10x).
We won’t actually be using the profiler in the remainder of this tutorial, but it’s a critical tool in actually building your own CUDA programs. Now, let’s build AI from scratch in CUDA.
Have any questions about this article? Join the IAEE Discord.
Defining “AI From Scratch”
Of course, I’m not going out and mining silicone so I can make my own hand made computer chips. We’re going to rely on a lot of pre-existing technologies to implement AI in this tutorial. CUDA, from the perspective of hardcore low-level developers, is actually a high-level programming tool. However, relative to what most data scientists do in their daily lives, we’re basically working up from bedrock.
To make AI “from scratch” in CUDA, we’ll be implementing a few things:
We’ll need to start off with defining a few utilities. We’ll build a data structure that will help us keep track of the shape of data in the neural network, we’ll build an abstraction for errors in CUDA to help us with debugging, we’ll build an abstraction of a matrix, and we’ll build binary cross entropy.
Once all our utilities are set up, we’ll build a few classes that comprise the model itself. A generic class for a layer of the model, and an implementation of a linear layer, sigmoid activation, and ReLu activation.
After that, we’ll build, train, and test our model.
If that sounds like a lot of work, it is. But if you’re a data scientist I think you’ll find that looking at these implementations at such a low level is very helpful conceptually, and if you’re completely new to data science and don’t know what a “ReLu” activation is, you’re about to learn a lot.
Before we get into making this stuff, I want to briefly discuss how we’ll be coding this functionality.
Full code can be found here
The Structure of C++ in this project
Before, we were using %%cuda at the top of cell blocks in Google Colab to run CUDA code. That was a simple approach, but it meant we needed to run all of our code in one cell block. Moving forward we’re going to be using cell blocks to write text files with the %%writefile magic, then explicitly compiling the code using nvcc .
Whenever we define some functionality, we’re going to first define a header file. Here’s an arbitrary example of a header file:
%%writefile someClass.hh

// this is used so, if someClass gets imported multiple times across several
// documents, it only actually gets imported once.
#pragma once

class ClassWithFunctionality {
    // defining private things for internal use
private:
    // defining private data
    int someValue;
    int anotherValue;

    // defining private functions
    void privateFunction1();
    void privateFunction2();

    // defining things accessible outside the object
public:
    // defining public data
    int somePublicValue;
    int someOtherPublicValue;

    // defining public functions
    ClassWithFunctionality(int constructorInput);
    void doSomething1();
    void doSomething2();
};
If you’re not familiar with this, don’t worry too much about it. It’s a C++ thing. We define a header file to basically block out what functionality something will have. Then, we can implement that thing in a corresponding CUDA file:
%%writefile someClass.cu

#include "someClass.hh"

// defining constructor
ClassWithFunctionality::ClassWithFunctionality(int constructorInput)
    : someValue(constructorInput), anotherValue(2), somePublicValue(3), someOtherPublicValue(4)
{}

void ClassWithFunctionality::doSomething1() {
    return;
}

void ClassWithFunctionality::doSomething2() {
    return;
}

void ClassWithFunctionality::privateFunction1() {
    return;
}

void ClassWithFunctionality::privateFunction2() {
    return;
}
If you’re from a Python world, you might think the constructor syntax is a little weird. This uses a syntax called an “initialization list”. Basically, this line of code sets the values of all of the stuff when an instance of a class is constructed.
someValue(constructorInput), anotherValue(2), somePublicValue(3), someOtherPublicValue(4)Now that we have both the header and the CUDA file, we can’t actually run it because there’s no main function. This is useful because we can import this into code that has a main function (you can only have one per program), but it means we need to whip one up real quick so we can test our functionality.
%%writefile main.cu
#include <iostream>
#include "someClass.hh"

// testing SomeClass
int main(void) {
    ClassWithFunctionality example(3);
    std::cout << "it works!" << std::endl;
    return 0;
}
Then, to actually run this code we can compile the code, run it, save the output to a file, then print out the file, with the following code block.
!nvcc someClass.cu main.cu -o outputFile.out
!./outputFile.out
Now that we have that squared away, we can define our first piece of functionality.
Utility 1: Shape
The AI we’ll be implementing heavily utilizes matrixes with a 2D shape. First, we can define a data structure called Shape which we can use to keep track of 2D sizes.
%%writefile shape.hh
#pragma once

struct Shape {
 size_t x, y;

 Shape(size_t x = 1, size_t y = 1);
};
%%writefile shape.cu
#include "shape.hh"
Shape::Shape(size_t x, size_t y) :
x(x), y(y)
{ }%%writefile main.cu
#include "shape.hh"
#include <iostream>
#include <stdio.h>
using namespace std;
//testing
int main( void ) {
Shape shape = Shape(100, 200);
cout << "shape x: " << shape.x << ", shape y: " << shape.y << endl;
}!nvcc shape.cu main.cu -o shape.out
!./shape.outUtility 2: NNException
If there’s an issue on the GPU, it can take a while for that issue to propagate back to the CPU. This can make debugging CUDA programms dificult, as bugs might throw errors in strange times. To alleviate this, we can use cudaGetLastError() to check for the most recent error on the GPU. NNException is a lightweight wrapper built around cudaGetLastError that allows us to check, throughout our code, if there was an error on the GPU.
%%writefile nn_exception.hh
#pragma once

#include <exception>
#include <iostream>

class NNException : std::exception {
private:
 const char* exception_message;

public:
 NNException(const char* exception_message) :
  exception_message(exception_message)
 { }

 virtual const char* what() const throw()
 {
  return exception_message;
 }

 static void throwIfDeviceErrorsOccurred(const char* exception_message) {
  cudaError_t error = cudaGetLastError();
  if (error != cudaSuccess) {
   std::cerr << error << ": " << exception_message;
   throw NNException(exception_message);
  }
 }
};
%%writefile main.cu
//With error handling
#include "nn_exception.hh"
#include <cuda_runtime.h>
int main() {
// Allocate memory on the GPU
float* d_data;
cudaError_t error = cudaMalloc((void**)&d_data, 100 * sizeof(float));
// Check for CUDA errors and throw an exception if any
try {
NNException::throwIfDeviceErrorsOccurred("Failed to allocate GPU memory");
} catch (const NNException& e) {
std::cerr << "Caught NNException: " << e.what() << std::endl;
return -1; // Return an error code
}
// Free the GPU memory
error = cudaFree(d_data);
// Check for CUDA errors again
try {
NNException::throwIfDeviceErrorsOccurred("Failed to free GPU memory");
} catch (const NNException& e) {
std::cerr << "Caught NNException: " << e.what() << std::endl;
return -1; // Return an error code
}
std::cout << "CUDA operations completed successfully" << std::endl;
return 0; // Return success
}!nvcc main.cu shape.cu -o nnexception.out
!./nnexception.outUtility 3: Matrix
This class abstracts some of the communication between the device and host, allowing a matrix of values to easily be passed between memory locations. It allows for:
memory to be allocated on the GPU for the matrix
memory to be allocated on the CPU for the matrix
memory to be allocated on both the CPU and GPU for the matrix
allocate memory, if it isn’t allocated already
copy data from the CPU RAM to GPU VRAM
copy data from the GPU VRAM to CPU RAM
overrides to allow the matrix to be indexed like an array


